If you’d like to just remove items from your list of blocked events from either Guard or Content Access:
In the HomePass app, open the More menu.
Select the Guard option.
On the bottom of the Guard settings page, you will find the Delete security events button.
Simply tap the button and confirm that you would like to clear the data.
– Note that once deleted, this data cannot be recovered.
– If you haven’t disabled Guard or Content Access features, more events will continue to populate the list. Just continue to repeat this process as often as you need.
How can I check the firmware version on my pods?
From the Home screen, scroll down to pod list in the Adapt section.
Tap on any pod you wish to see device information about.
Tap the ⋮ icon in the upper right-hand corner.
Tap View Hardware Info. Firmware version will be the first item in the list. Please visit this link for full release notes.
In addition to the firmware version, you can also view the pod’s serial number, MAC address and assigned IP address.
Create a new Wi-Fi Password for Home
During the initial setup, the first password created is a Home zone password, although you can add more. Local network access to devices connected to your network in the Home zone can be selectively shared with devices connecting with a Guest zone password.
Open the More tab and click on the Control button.
While in the Home settings page, tap on New home Password.
Enter your new password.
Tap on the Add to save.
Create a password for Internet Only
Open the More tab and click on the Control button.
While in the Internet Only settings page, tap on New internet only password.
Enter a new password.
Use the drop-down arrow next to Auto-disable Wi-Fi Password and choose one of the options.
Tap on the Add to save.
Create a new password for a Guest
Open the More tab and click on the Control button.
While in the Guest settings page, tap on New Guest Password.
Enter a name* and a new password.
Use the drop-down arrow next to Auto-disable Wi-Fi Password and choose one of the options.
Add a checkmark next to one or more Shared Home Devices (printer, NAS, media player), to allow your guest access to it over the local network.
Tap on the Add to save.
*You can set up different device access permissions and Auto-disable Wi-Fi Password settings for each name under the Guest zone.
How to connect your All West email to another WebMail client
Setting up your All West email address to a 3rd client has never been easier
All West is not able to support 3rd party email clients or software. Webmail is the only mail option our customer service team directly supports. However, the steps below are provide for those who still wish to use mail clients other then webmail and who are able to support themselves.
Connect to iOS Device
Here are the steps to connect your email to iOS devices including iPhone and iPad:
Connect to Microsoft Outlook
Here are the steps to connect your All West email using Microsoft Outlook. To begin, ensure you have the necessary account information ready, such as your email address and password. For detailed instructions, including the exact settings you’ll need to input, refer to the Outlook Exchange Settings.
Once you have completed the configuration, you’ll be able to send and receive emails directly from Outlook, streamlining your workflow and improving your email management.
Third-Party Mail Programs (clients) and Phone Apps
The configuration of third-party mail applications like Outlook, Windows Mail, Thunderbird, and mail applications on iOS or Android devices is left to our customers or their preferred IT/help experts. The settings below are universal and should work on any mail client, on any device. A simple Google search should provide results to configure all popular email client programs/apps.
Auto-Configuration
Many mail clients will work with All West’s auto-configurations. This means that you only need to input your login information into the client and the mail client should automatically configure allsettings. There are instances in which auto-configuration fails and manual configuration is required.
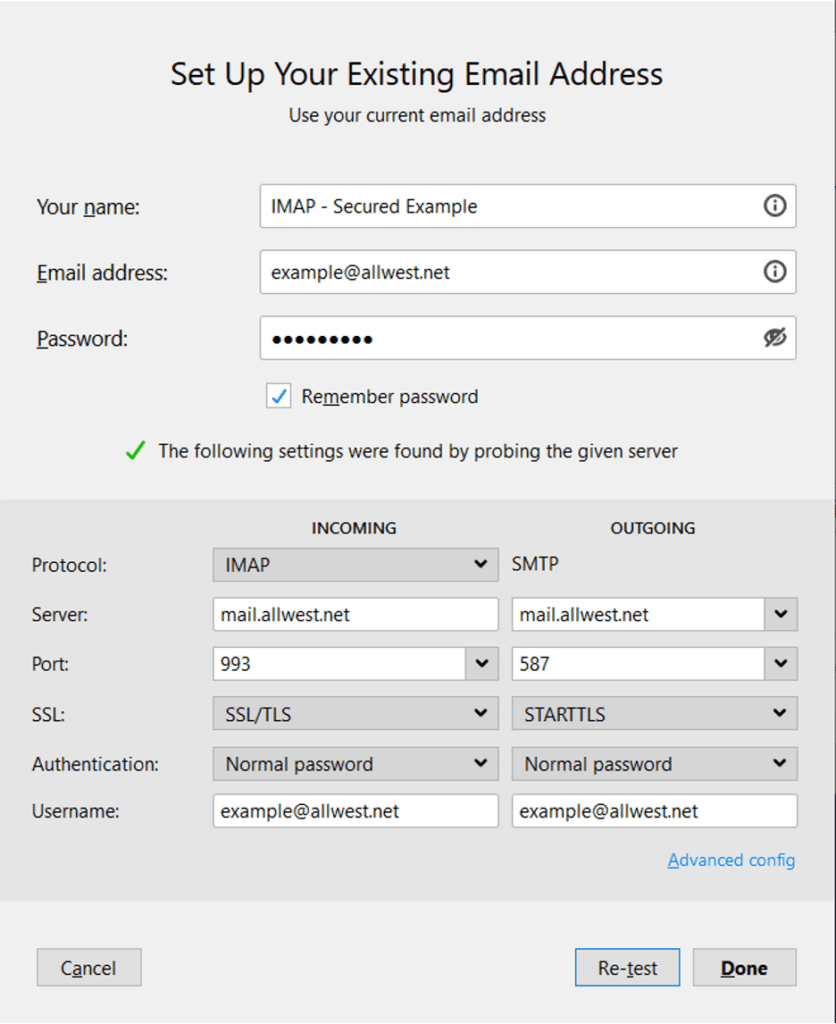
Example IMAP Manual Configuration
Incoming: 993 SSL/TLS
Outgoing: 587 & 465 SSL /TLS
MagicMail – Email Settings Quick Reference (IMAP)
Incoming Mail Server Name: mail.allwest.net
E-mail Username: john.doe@allwest.net or jane.doe@sweetwaterhsa.com
(replace john.doe with your e-mail prefix)
Incoming Mail Port: 993 (selecting encryption method “Use SSL/TLS”)
Outgoing Mail Server Name: mail.allwest.net
Outgoing Mail Server Username: john.doe@allwest.net (replace john.doe with your e-mail prefix)
You can easily access your All West email directly from the home page of the All West website. Simply navigate to the top menu and scroll over the "Support" option. From there, select "All West WebMail Login." We fully support using the WebMail client to manage your All West Communications email.
If you are having any difficulty signing into your WebMail account, feel free to contact our support team via email or phone. We’re here to help!
For additional information on setting up your email with a 3rd party email client, please refer to our Email Setup Guide.
How to Protect Yourself from Email Phishing Attempts and Ransomware?
Email is an essential communication tool, which makes it a prime avenue for attackers to steal sensitive information or spread malicious code.
There are several methods you can use to protect yourself from email phishing and ransomware:
- Employ email encryption to protect sensitive information
- Hover over links and be wary of attachments
- Directly contact companies or individuals if you receive an alarming message
- Install antivirus software and keep it up to date
How Can I Be Cyber Aware?
As technology evolves, so does cybercrime. It’s important to identify the main methods of attack to help keep you and your identity safe online. Here are some ways to be cyber aware:
- Be aware and know how to identify what is or isn’t safe
- Use caution when sharing or verifying information
- Have security software on devices and keep it up to date
- Create strong, unique passwords and use two-factor authorization
How do I connect to All West.tv?
All West.tv is an app-based streaming service and therefore requires an internet connection. If your All West.tv is not working, please make sure your device is connected to the internet and that you have a working internet connection. Additionally, check our to see if there is a current outage for our TV services. If you think it may be your remote, replace the batteries or reboot your remote if you are still experiencing issues.