How do I approve (unblock) a website?

You can approve a website for a person, the entire network or a device if not assigned to a person. Up to 50 websites can be approved in total.

If you notice a website has been incorrectly blocked, please report it to support.

Approving Websites for Everyone:

  1. From the Home page, tap on the Guard events.
  2. Go to Approve tab and tap on Approve.
  3. Choosing Approve Website allows you to enter the URL of domain, while Approve IP Address allows you to enter the server IP address.
  4. Enter the URL or IP address and tap on Approve to save. Please note that the full domain name is required. For example; make sure to write “youtube.com” instead of “youtube”.
  5. Tap on Apply to confirm the changes.
  6. Additionally, you are able to view previously blocked sites under the Protected tab. Tap or swipe on the blocked event to start the approval flow.

Approve websites at a person or device level:

  1. Navigate to the desired person or device.
  2. Tap on Manage security events at the bottom of the page.
  3. Tap on Approve.
  4. Choosing Approve Website allows you to enter the URL of domain, while Approve IP Address allows you to enter the server IP address.
  5. Based on your previous choice, enter the URL or IP address and tap the checkmark to save. The full domain name is required for websites. For example; make sure to write“youtube.com” instead of “youtube”.
  6. Tap on Approve to confirm your choice.
  7. If you are approving the site for a device that has been assigned to a person, the rule will also apply to the person. Likewise, approving a site for the person automatically applies that ruleto all of their assigned devices. If the device is not assigned, the rule will only apply to the device.

You can also unblock a website from Protected list.

  1. Simply swipe or tap to add a site to your Approved list.
  2. Confirm that the site is now approved.

How do I add or remove a person?

Adding people allows you to conveniently monitor and manage their Wi-Fi access.

Adding a Person:

  1. From the People screen, tap on + button.
  2. Choose the Create a person option.
  3. Add a photo using the + , enter the Person name and Email (optional) and tap on Next.
  4. Set their Device profile information. This allows you to control Content access as well as their Guard settings for all their assigned devices while they are connected to the network.
  5. Tap on Done and the person will be added to the list of people.
  6. Use the Tap to assign device option under their card. The devices you select will apply the rules set in the previous step to those devices and allow you to monitor and manage theperson’s Internet usage.
  7. Once all device have been selected and you tap on Done, you will be prompted to assign a Primary device, which is used to determine if they are home. Be sure to choose a device thatthey will always take with them.
  8. Tap on Done once a primary device is chosen.

Note: Creating a person using the steps above does not give them the ability to manage the network..

Removing a Person:

  1. From the person’s detail screen, tap on the ⋮ on the top right-hand corner.
  2. Tap on Remove person which will remove the profile and historical data consumption information for that person. All previously assigned devices for that person will now be unassigned.

Note: This does not disable their access to the Wi-Fi if they still have the password..

How can I delete my Plume data history?

All Plume members have the right to be forgotten.

Delete security event data:

If you’d like to just remove items from your list of blocked events from either Guard or Content Access:

  1. In the HomePass app, open the More menu.
  2. Select the Guard option.
  3. On the bottom of the Guard settings page, you will find the Delete security events button.
  4. Simply tap the button and confirm that you would like to clear the data.

– Note that once deleted, this data cannot be recovered.

– If you haven’t disabled Guard or Content Access features, more events will continue to populate the list. Just continue to repeat this process as often as you need.

How can I check the firmware version on my pods?

  1. From the Home screen, scroll down to pod list in the Adapt section.
  2. Tap on any pod you wish to see device information about.
  3. Tap the icon in the upper right-hand corner.
  4. Tap View Hardware Info. Firmware version will be the first item in the list. Please visit this link for full release notes.

In addition to the firmware version, you can also view the pod’s serial number, MAC address and assigned IP address.

Create a new Wi-Fi Password for Home

During the initial setup, the first password created is a Home zone password, although you can add more. Local network access to devices connected to your network in the Home zone can be selectively shared with devices connecting with a Guest zone password.

  1. Open the More tab and click on the Control button.
  2. While in the Home settings page, tap on New home Password.
  3. Enter your new password.
  4. Tap on the Add to save.

Create a password for Internet Only

  1. Open the More tab and click on the Control button.
  2. While in the Internet Only settings page, tap on New internet only password.
  3. Enter a new password.
  4. Use the drop-down arrow next to Auto-disable Wi-Fi Password and choose one of the options.
  5. Tap on the Add to save.

Create a new password for a Guest

  1. Open the More tab and click on the Control button.
  2. While in the Guest settings page, tap on New Guest Password.
  3. Enter a name* and a new password.
  4. Use the drop-down arrow next to Auto-disable Wi-Fi Password and choose one of the options.
  5. Add a checkmark next to one or more Shared Home Devices (printer, NAS, media player), to allow your guest access to it over the local network.
  6. Tap on the Add to save.

*You can set up different device access permissions and Auto-disable Wi-Fi Password settings for each name under the Guest zone.

How to connect your All West email to another WebMail client

All West is not able to support 3rd party email clients or software. Webmail is the only mail option our customer service team directly supports. However, the steps below are provide for those who still wish to use mail clients other then webmail and who are able to support themselves.

Here are the steps to connect your email to iOS devices including iPhone and iPad:

iOS MagicMail Configuration

Here are the steps to connect using Microsoft Outlook:

Outlook Exchange Settings

Third-Party Mail Programs (clients) and Phone Apps

The configuration of third-party mail applications like Outlook, Windows Mail, Thunderbird, and mail applications on iOS or Android devices is left to our customers or their preferred IT/help experts. The settings below are universal and should work on any mail client, on any device. A simple Google search should provide results to configure all popular email client programs/apps.

Auto-Configuration

Many mail clients will work with All West’s auto-configurations. This means that you only need to input your login information into the client and the mail client should automatically configure allsettings. There are instances in which auto-configuration fails and manual configuration is required.

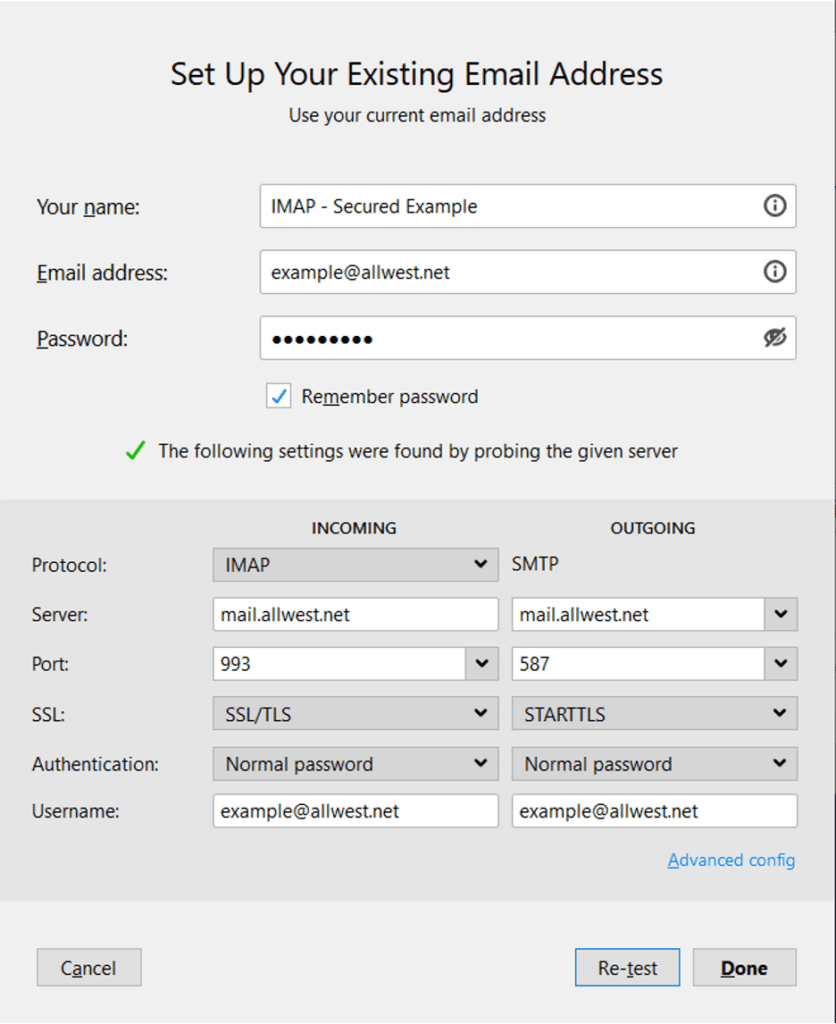
Example IMAP Manual Configuration

Incoming: 993 SSL/TLS

Outgoing: 587 & 465 SSL /TLS

MagicMail – Email Settings Quick Reference (IMAP)

Incoming Mail Server Name: mail.allwest.net

E-mail Username: john.doe@allwest.net or jane.doe@sweetwaterhsa.com

(replace john.doe with your e-mail prefix)

Incoming Mail Port: 993 (selecting encryption method “Use SSL/TLS”)

Outgoing Mail Server Name: mail.allwest.net

Outgoing Mail Server Username: john.doe@allwest.net (replace john.doe with your e-mail prefix)

SMTP Outgoing Port: 587 (selecting encryption method “Use SSL” or “STARTTLS”)

How to set up an All West email

You can access your All West email directly from the home page of the All West website. Go to the top menu and scroll over "Support." Select "All West WebMail Login." We fully support connecting to your All West Communications email with the WebMail client option. Please email or call our support if you are having difficulty signing into your WebMail.

What is Ransomware?

Ransomware is malware that encrypts files on a victim’s device, making them unusable. These encrypted files are used by hackers as a ransom in exchange for access to the files. Defend yourself from ransomware by

- backing up your data and securing the backups

- keeping security software up to date

- using secure networks

- staying informed and practicing safe web-searching

Ransomware is one of the fastest-growing methods of cyberattack. Everyone is at risk.